Create an ordering page with Square Online
About the Square Online ordering page
The ordering page for Square Online can be the focal point of your online catalogue, where buyers can shop, browse and order items from your website. This page gives you two layout options:
Shop All: an option for selling physical goods, often associated with products you might find in a retail shop. This template has the best support for shipping.
Order Online: an option for selling prepared food and beverage items, often associated with menu items you’d find in a restaurant, or any size food-and-drink vendor. This template has the best support for local delivery and Click and Collect.
You can easily add an ordering page to any Square Online site. If you already have a site built with a third-party host that needs a catalogue, you can also use a Square Online ordering page by linking to it from your third-party website. This makes accepting payments online with Square simple and easy, no matter where your website is hosted.
Before you start
You can create an ordering page, set up a personalised order screen and set up your existing website with Square Online from your Square Dashboard.
Make sure you’ve set up a Square Online account. Learn how to set up your online store with Square Online to get started.
Make sure you have items in your Item Library ready to sell online. Learn how to set up items for your online store.
With Square Online Plus or Premium, you can customise the buyer experience on your ordering page by turning it into a personalised order screen specific to each customer. The personalised order screen is only available for the Order Online template at this time.
Add an ordering page to your Square Online site
Sign in to your Square Dashboard and go to Sales channels > Online > Website > Edit site.
Select + > Page.
Select Shop and choose either the Shop All or Order Online ordering page template.
Select Add to include the page on your site. Each template has different features you can customise.
Publish your site to see the changes live.
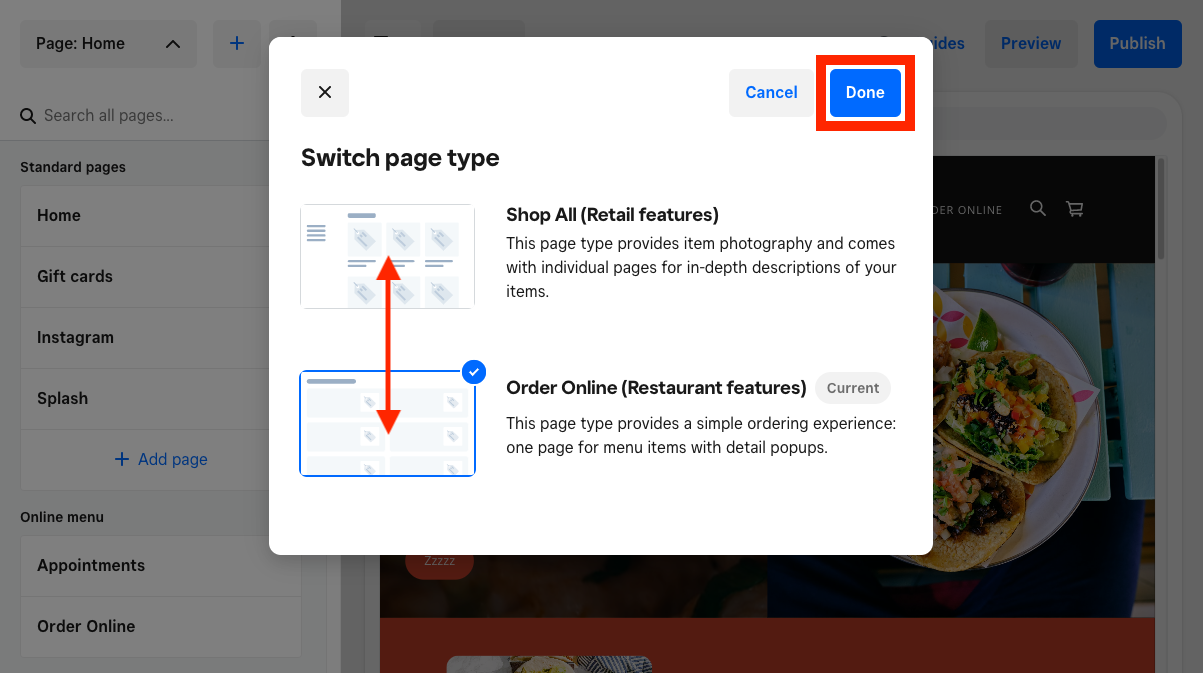
To switch your template:
Select the Page drop-down menu.
For the Shop All or Order Online page, select ••• > Switch template.
Choose your preferred template and select Done.
Display items and categories on your ordering page
You can add items and categories from your Item Library to your ordering page. You have different options for customisation depending on your template.
- Sign in to your Square Dashboard and go to Sales channels > Online > Website > Edit site.
- Select the Page drop-down menu and open your Shop All page.
- Select the Item list section in the editing panel to open the settings, then select Arrange items.
- Choose any of the automatic arrangement options in the drop-down menu, including Popularity, Newest, Price (High-Low), Price (Low-High), Alphabetical (A-Z) or Alphabetical (Z-A). You can also choose Custom to drag and drop your items in the order of your choosing.
- Sign in to your Square Dashboard and go to Sales channels > Online > Website > Edit site.
- Select the Page drop-down menu and open your Order Online page.
- Select the Item list section in the editing panel to open the settings, then select View items.
- Toggle Most popular on to show items frequently ordered by customers, and Recent orders to show items specific to each customer.
- To add a category menu at the top of your item list section, go back to your Item list in the editing panel and select Content to toggle Category menu on.
- To turn cross-selling on, go back to your Item list in the editing panel and select Content > Item view to tick the Customers also purchased option.
With Order Online, items will be shown in the order they appear in your Item Library. Go to your Item Library if you need to make changes.
Set up your ordering page as a personalised order screen
To personalise the ordering experience on your Square Online site, enable the personalised order screen – a customised version of your ordering page that provides buyers with item recommendations, quick reordering options, customer account access, active vouchers and much more.
Sign in to your Square Dashboard and go to Sales channels > Online > Website > Edit site.
Select the Page drop-down menu.
Under Order Online, toggle Personalised order screen on. If you’re using Shop All, you’ll need to switch your template first to see this option.
Publish your site to see the changes live.
You can select the different parts of your personalised order screen to customise them from the editing panel.
Add an ordering page to your third-party site
To use Square Online as an ordering page for your existing third-party website, you’ll need to create the ordering page, publish it to a domain and link to it from your third-party site.
To start building an ordering page, select Single ordering page when you first sign up for Square Online, or follow these steps:
- Sign in to your Square Dashboard and go to Sales channels > Online > Website > Edit site.
- Select the Page drop-down menu to see your pages.
- Under Shop All or Order Online, select ••• > Switch template if necessary.
- Under Shop All or Order Online, select ••• > Make this my homepage.
- Delete all other pages by selecting ••• > Delete page.
- Customise your ordering page as needed.
Once your Square Online ordering page is set up, you’ll need to publish it to a domain.
You can use a free Square-branded subdomain that never expires (like ‘mybusiness.square.site’), or a custom subdomain with your branding (like ‘store.mybusiness.com’ or ‘order.myrestaurant.com’). Additionally, you can connect an entirely different third-party domain to your ordering page, or purchase a new one directly from Square.