Manage deliveries in Square Dashboard
About deliveries
Shipments Manager allows you to efficiently handle shipping for your orders and streamline your delivery process. The Shipments page in the Square Dashboard provides features, such as viewing delivery details, searching and filtering deliveries, updating fulfilment status and tracking deliveries.
Before you begin
You can view and manage deliveries at any stage of the fulfilment flow from the Square Dashboard.
You can search by customer name, address, fulfilment location, tracking number, courier, service or item (name, variation name or SKU).
Fulfilment statuses cannot be updated on shipped orders.
View deliveries
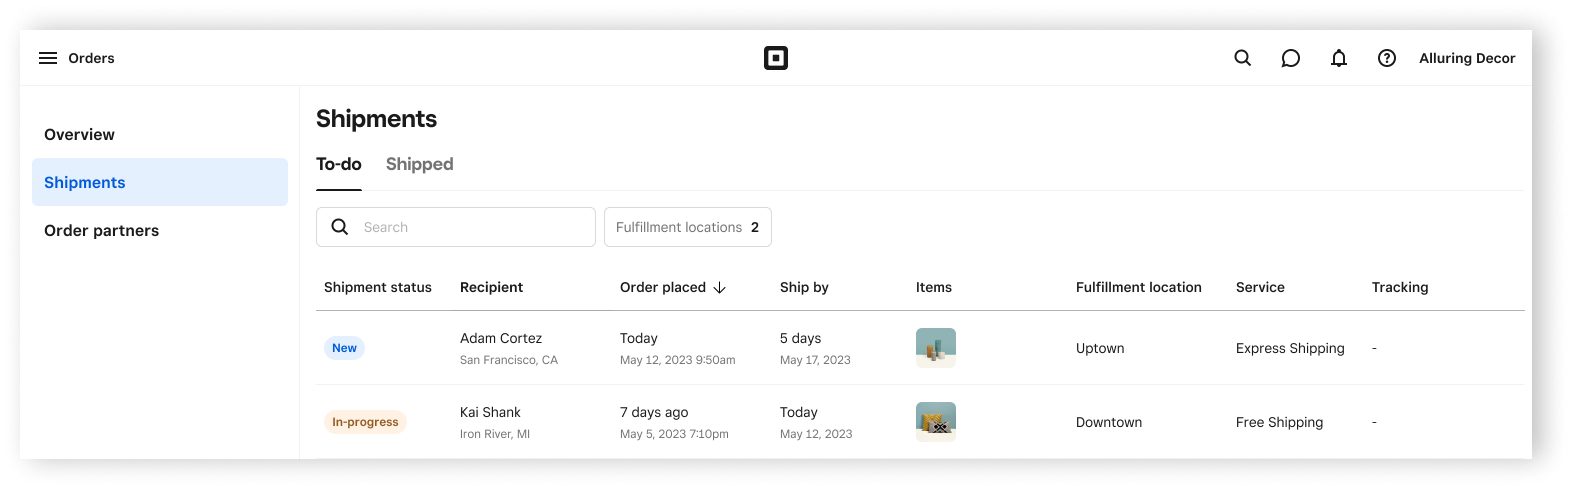
Sign in to Square Dashboard and go to Orders & payments (or Invoices & payments or Payments) > Orders > Shipments.
Click To-do to view all delivery orders that require action by you and have a New or In-progress status.
Click Shipped to view all orders that are marked as shipped.
Enter the order details in the Search box to locate a specific order.
Click Fulfilmentlocation to view your locations and tick the box next to the location you’d like to view.
Update fulfilment status
To update the status for an entire order:
- Sign in to Square Dashboard and go to Orders & payments (or Invoices & payments or Payments) > Orders > Shipments.
- Click To-do.
- Select an individual order.
- Click Actions and choose Mark as in progress or Mark as shipped.
- Enter the tracking information and select the courier.
Orders updated to Shipped will send a delivery email notification to your customer.
To update the fulfilment status on multiple orders at once:
- Sign in to Square Dashboard and go to Orders & payments (or Invoices & payments or Payments) > Orders > Shipments.
- Click To-do.
- Tick the box next to each order that you want to update the status on.
- At the bottom of the page, click Actions > Mark as in progress or Mark as shipped.
- Click Mark as in progress or Mark as shipped to confirm.
You can select up to 25 orders at a time to take a bulk action on.
Update fulfilment information
You can add additional or update existing information on orders based on the status of the order. You won't be able to add or update the courier, tracking, delivery address or shipped-on date once an order updates to Shipped.
- Sign in to Square Dashboard and go to Orders & payments (or Invoices & payments or Payments) > Orders > Shipments.
- Click To-do.
- Click an individual order to view more details.
- Click Add next to Courier or click the existing courier to update.
- Select a supported courier.
- Supported couriers: UPS, FedEx, DHL Express and United States Postal Service (USPS).
- Click Done.
If an unsupported courier is used, the created tracking link will direct you to a Google search with the tracking number. If a supported courier is used, the created tacking link will direct you to the courier’s tracking status page.
![]()
To include the date the order needs to be sent by the business to the customer:
- Sign in to Square Dashboard and go to Orders & payments (or Invoices & payments or Payments) > Orders > Shipments.
- Click To-do.
- Click an individual order to view more details.
- Next to ‘Fulfil by,’ click Set a date and enter the date.
Shipped-on date will automatically show when you change the order to Shipped.
- Sign in to Square Dashboard and go to Orders & payments (or Invoices & payments or Payments) > Orders > Shipments.
- Click To-do.
- Click an individual order to view more details.
- Click the address next to Ship to.
- Enter the new delivery address.
- Click Save.
If the address cannot be verified, you can click Back to edit to review the entry or click Save anyway to continue without verification.
- Sign in to Square Dashboard and go to Orders & payments (or Invoices & payments or Payments) > Orders > Shipments.
- Click To-do.
- Click an individual order to view more details.
- Click Add next to Tracking info to manually enter the tracking number.
- Click the existing tracking number to update it. You’ll see an error message if the tracking number doesn’t match the courier.
- Click Done.
You cannot add or update tracking information if the order is updated to Shipped.
Add or update shipment tracking
Sign in to Square Dashboard and go to Orders & payments (or Invoices & payments or Payments) > Orders > Shipments.
Click To-do.
Click an individual order to view more details.
Click Add next to Tracking info to manually enter the tracking number.
Click the existing tracking number to update it. You’ll see an error message if the tracking number doesn’t match the courier.
Click Done.
You cannot add or update tracking information if the order is updated to Shipped.
Print packing slips
- Sign in to Square Dashboard and go to Orders & payments (or Invoices & payments or Payments) > Orders > Shipments.
- Click To-do or Shipped.
- Click an individual shipment order to view more details.
- Click Print packing slip to generate an 8.5 x 11” packing slip to include with a shipment order.
- Click the print icon to print the packing slip.
The packing slip will show the customer, carrier, shipping rate, item name/quantity, company name and address, and logo.
To print packing slips for multiple shipments orders at once:
- Sign in to Square Dashboard and go to Orders & payments (or Invoices & payments or Payments) > Orders > Shipments.
- Click To-do.
- Check the box next to each shipment order that you want to print a packing slip for.
- At the bottom of the page, click Actions > Print packing slips. View the generated 8.5 x 11” packing slips.
- Click the print icon to print the packing slips.
You can bulk edit up to 25 shipment orders at a time.
Split delivery
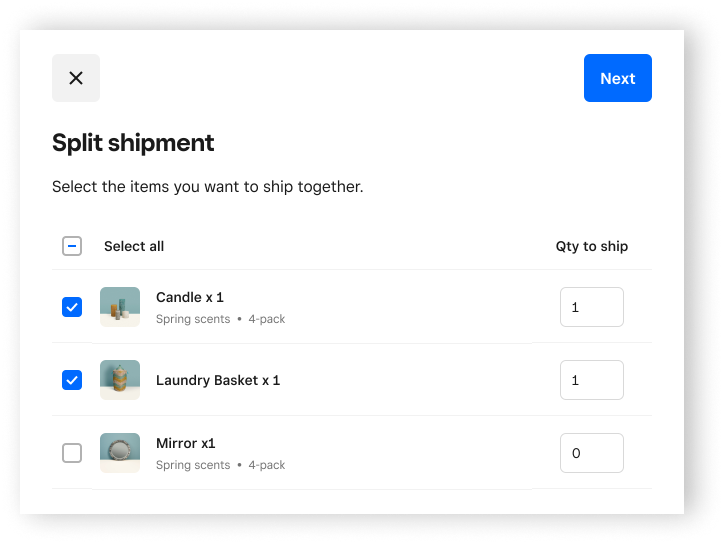
To separate a single order into multiple deliveries:
Sign in to Square Dashboard and go to Orders & payments (or Invoices & payments or Payments) > Orders > Shipments.
Click To-do.
Click an individual order to view more details.
Click Split shipment.
Tick the box next to the items you want to ship together.
Click Next > Create new shipments.
This action will split the order into two new deliveries and cannot be reversed.